Make your recorder instruction more engaging with creative props and hands-on strategies. This practical guide shares classroom-tested ideas using manipulatives, visuals, and physical activities to help students develop proper technique while staying excited about learning.
As a clarinet player, the recorder is one of my favorite things to teach as an elementary music teacher. Where other teachers cringe, I get excited to hear the squaks and squeaks that come with learning a new instrument that can open so many doors.
Throughout the years, I have come across many handy ideas to make learning recorders more interactive and interesting. I remember sitting in music class with my recorder, with a method book, learning in what I thought was the most boring way possible. I do not want that experience for my students.
Let’s Get Physical
Let’s start with some physical hacks to get the kids moving. If you use the body staff to teach solfege, you could easily adapt that idea for the recorder. This allows the kids to see the movement up and down the instrument. I also created a large recorder to display on my wall that is 4.5’ tall that I can stand next to if the body staff doesn’t make sense to all my students.
If they need something to do with their hands without an instrument, use old rhythm sticks or dowel rods with circles drawn on them for silent practice. You can also use circle stickers (or the hole reinforcement stickers for notebook paper) and put them on your right forearm. Students simply hold up their right hand and wrap their left hand around the right arm. This idea can be taken to the lunch line, the bus, and any other quiet place!
I use their hands to demonstrate proper breath. I have the kids hold their open palm about 6” from their mouth. I say, “Imagine you are fogging up a mirror or window, is that air warm or cold? Fast or slow?” This helps students imagine the proper warm, calm breath needed for a good, supported sound. You can also use hand mirrors for this example, but be prepared for recorder class to turn into a beauty shop!
To show what not to do, have the students use the same hand and imagine blowing out the candles on a cake when you turn a hundred years old. Is the air fast? Cool? If you really want to drive the point home, allow them to skip straight to using that air on the instrument. I have found that doing this prevents the primal need to scream on the instrument. They do it once, and get it out of their system!
Manipulatives
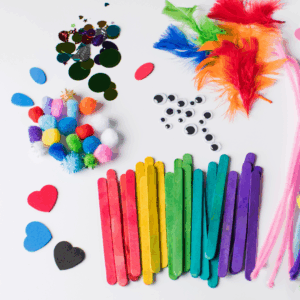
Manipulatives can be used for our tactile learners. I spent a lot of time and energy researching quality manipulatives that could be used for multiple concepts and here is what I have tried and suggest:
Feathers
With craft feathers from the store, I use feathers to talk about phrasing and using a continuous stream of air. I have students “paint the air” with the feather and have them notice that the feather doesn’t make any sudden movements, it glides. You can also have them drop feathers to the ground to demonstrate smooth movement and phrasing.
Pom poms and straws
I use two different straws- a regular drinking straw and a coffee stirrer straw. I also give students a small pom pom and a larger pom pom. I have them experiment blowing through the straws to see which one is best to move which pom pom across the floor. You can turn this into a competition if you like. This is a great way to demonstrate a steady flow of air.
Mirrors
As stated above, I use mirrors for demonstrating “fog the window” but you can also use them to show the students their embouchure and mouth shape. If a student is getting a “blown-out” sound, they may have way too much mouthpiece in their mouth. A mirror can allow them to see their specific playing position.
Bubbles
Individual bubbles are a great way to get outside and work on tonguing! I talk about using the “too” or “du” syllables and see if students can produce multiple bubbles in one breath. Plus, going outside is never a bad thing!
Bracelets
I have a bucket full of plastic bracelets (I have used pipe cleaners made into bracelets before) that students are welcome to use to remember their left hand should be on top. I use them for folk dancing so my kids are used to grabbing them as they need them. You can purchase them if you want certain colors, but most of mine have come from vendors at conferences!
Visuals
Manipulatives are wonderful, but visuals are also a great way to help your students be successful. Many times, the recorder visuals are multipurpose and can be used for more than just recorder instruction!
Large Recorder
I created a paper recorder that stands about 4.5’ tall. I laminated it so I am able to write on it with a dry-erase marker, and it has velcro dots on it so I can put cute little reminders over the holes to help students remember which one is which.
Hand Signs
This idea was actually from a student of mine! The kids noticed that when I put up the fingerings for them in the front of the class, my hands would make a shadow from the projector, creating a little puppet. One class really took off with this, saying B was the Rooster, A was a rabbit, and G was a unicorn. They created little drawings to put next to the large poster recorder (above). Sometimes, your students are more creative than you are!
ASL- American Sign Language
A great way to incorporate American Sign Language (ASL) into your class is to use it with silent practice or “I say, You Play.” I have the ASL fingerspelling next to the fingering poster on my board so I can introduce them together in class. Use the letters to signal which letter to play during a rhythm exercise, or have students figure out the letters, then play the passage.
Using an Alto or Tenor recorder
Sometimes, I use an Alto or Tenor recorder to show students fingerings on a larger scale. I use my document camera to show fingerings, but oftentimes, I grab my Tenor when walking around the room so the students can see your fingers spread out. I would not play Alto with the Sopranos in the room (different tuning!) but sometimes seeing the size difference helps make more connections. Plus, they get to see another instrument!
Directional Signs on Walls
I always have signs up on all of my walls that say “Left” and “Right” in English and Spanish. I put them on all walls just in case students are working in groups and not facing the same direction as I am. Not only does this help in recorder instruction, but folk dance, primary students, and more benefit from a gentle reminder of which hand is which!
Many of these ideas can be used for multiple concepts. Put on your thinking cap and get creative for the new school year. Using these tips, I hope you have a wonderful recorder-playing year!
Kelsey Helton is an elementary music teacher in the Dallas-Fort Worth area. Kelsey currently teaches PreK-5th grade music in Grapevine-Colleyville ISD and directs an after-school choir, the Singing Stars, and directs the all-school musical. She is also a musician at…