SUMMARY
Adapting to teach music moving from room to room can be challenging, but not impossible! Here’s an “ABC” rundown of some ways you can plan and prepare, rather than panic.
by Danielle Ingram

Adapting to teach music moving from room to room can be challenging, but not impossible! Here’s an “ABC” rundown of some ways you can plan and prepare, rather than panic.
by Danielle Ingram
First, it’s okay to take a moment to acknowledge the disappointment you feel in finding out your music room is being taken over, whether temporarily or indefinitely. Acknowledge it, but DON’T stay in that state. Realize that there are some things you have the power to do, and hopefully what’s outlined below will help you take the initiative to do just that!
Next, you’ll need to secure storage for your music room items. There may be some things that can stay where they currently are, but most likely, you’ll need to move things to different areas of your school building. Wherever your things end up going (and it may be more than one area), make sure that your music items will be stored safely and that you’ll have access to them throughout the school year.
When it comes to choosing your cart, if an unused cart that’s already available at your school won’t work, there are a plethora of other options to be found by searching online. Carts come in metal, plastic, tall, short, adjustable, and fixed shelving options with all kinds of different add-ons, too. There are carts specifically labeled and geared towards teachers, or you might go with an audio/visual (AV), utility, technology, or service cart. In your cart research, though, do keep the following in mind: bigger is NOT always better!
Yes, you’ll want space for storing your daily teaching items, but remember that you’ll want a cart that’s easy to roll, pivot, and able to fit through the classroom doorways. Some carts only have two of the four wheels that turn, preventing fluid 360-degree pivoting. To avoid this, look for wording in the description that mentions “full-swivel” wheels. Most metal AV carts have these types of wheels, even if not mentioned in the specifications. Although not necessary (but nice to have), carts can also come with a pull-out laptop tray, locked storage, or an attached extension cord.
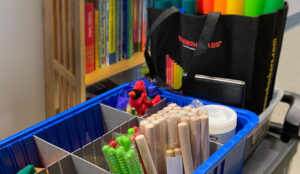
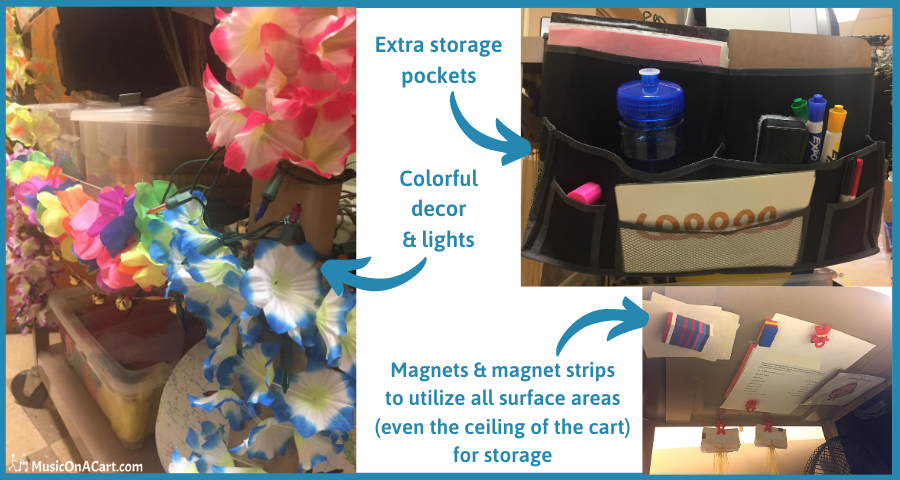
Once you’ve secured a cart, easily maximize storage by utilizing magnets and magnet strips if your cart is metal, or removable hooks if your cart is another material. Back seat car organizers give increased pocket space on the sides of your cart for “desk” supplies and smaller manipulatives or poster cards. Stackable storage bins keep instruments sorted, plus transparent bins allow you to easily view its contents for quick grab-and-go as you prepare your cart each morning. If your bins are opaque, simply add labels or write the contents with marker on at least two sides. If your cart doesn’t have a “lip” around the edges to keep items from rolling off, a small rubber mat or rubber shelf lining can help grip your cart’s contents as you roll down the hallways. And don’t forget, decorations aren’t only for classroom teachers! Add some fun decor, stickers, or even lights to brighten up the situation (pun totally intended)!
Music teachers might believe their entire curriculum needs overhauling when they move onto a cart. That’s not quite true. Yes, modifications must be made, but by no means do you have to start all over again from scratch. Don’t overwhelm yourself trying to map out the entire year before the first day of school. Start small and begin with just the first month of music lesson activities. Once you’ve had a few weeks of moving about on a cart, you’ll have a better sense of what you can do in the space and time given. Be open to adjusting your expectations…change what doesn’t work; celebrate and keep what does.
A good tip for classroom and cart music teachers alike is to convert all of your most used CDs into a digital library. Take it a step further by creating a specific playlist to utilize for the current week (or rotation) of lessons you’re teaching. You’ll save countless minutes by not swapping CDs or scrolling through numerous playlist tracks trying to find the exact song you want. Also, have some stand-by “fillers” in your weekly playlist in case you have a few extra minutes at the end of a lesson or are waiting for the classroom teacher to return. This filler music can be anything from movement action songs to engaging listening pieces from programmatic music.
For movement activities, try taking students outside or merely utilizing the space beside their desks. Remember, movement is more than bodies going across vast distances of space in tempo or to beats. Movement is high, middle, low levels of self-space, isolating various body parts, weighted or free-flowing, among many other things, too!
Regarding instruments, consider how much class time you’re willing to spend to sufficiently disinfect them. Some instruments, such as egg shakers or jingles, lend themselves well to quick and easy disinfecting. So do the plastic handles of barred instrument mallets. If your district won’t allow sharing of any kind, then consider students having their own personal basic percussion instrument sets, whether instrument kits are purchased or handmade by students as part of a music class activity. Also, don’t discount body percussion and the pencils, markers, and books already in their possession that can also make some great, layered rhythmic sounds!
Communication is key! Touch base with your principals about safely storing your music room items, advocate for a home base/prep space for you to sit, rest, and plan (even if the space is shared with other teachers). Additionally, try securing your teaching schedule from your administrators as soon as possible to assist your planning.
Communicate with the teachers whose rooms you’ll be entering. Touch base in person (or email) to discuss with the classroom teacher how you’d like the students prepared upon your arrival for music class and discuss what items students can have at the ready. If teachers are prepping in the classroom during music time, request that any students who approach them with questions be re-directed to you as the “headteacher.” Ask about access to the technology in the room and whiteboard space to write on, then do a walkthrough of your schedule to scope out how each classroom is set up. Check what adapters might be needed to connect to the tech (it may not be the same for every room) and where the available outlets are located. If you have little to no travel time between class periods, communicate that, too, and thank them in advance for their patience!
In closing, remember regardless of your teaching situation, the beauty of music is shared with your students. Hopefully, the above “ABC” points can start you off in the right direction as you begin your music cart teaching journey!
This article was originally published by Music ConstructED on 8/23/2020.

Contributor
Danielle Ingram greatly enjoys equipping her students with the musical knowledge and skills to become lifelong music makers. She has 17 years experience teaching elementary general/choral music, has served as a Clinical Educator and District Mentor advising pre-service and novice…
Discover more from Danielle